Home Blog Page 10

How to Measure Margarita Ingredients Consistently
0
How to Measure Margarita Ingredients Consistently
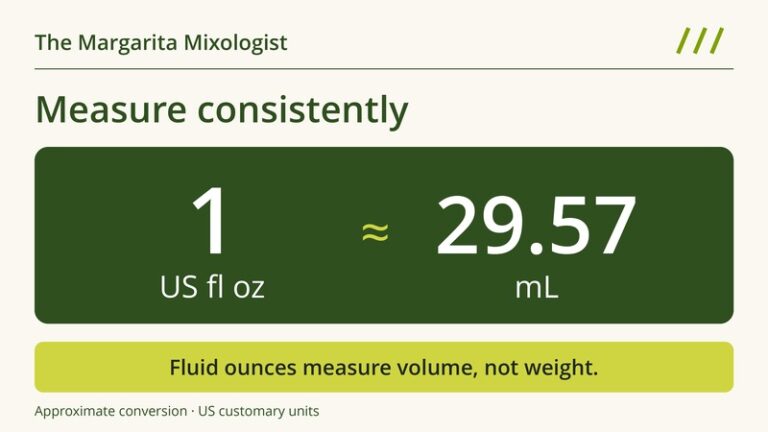
For US measurements, 1 fluid ounce is approximately 29.57 mL. Use fluid volume rather than weight when following a volume-based recipe.

To measure a margarita consistently, use one unit system, choose a tool with markings for the amounts you need, and repeat the same filling and pouring method. Measure the juice and sweetener as carefully as the tequila. Then write down any adjustment so the next drink starts from a known recipe.

You do not need a laboratory on the kitchen counter. A clearly marked jigger or small liquid measure, a little care, and a short recipe note make a useful starting kit.

Start with the units

Milliliters and fluid ounces measure volume. Grams and weight ounces measure mass. A scale reading of 30 g does not automatically replace 30 mL of tequila, lime juice, or syrup. Converting between mass and volume requires the density of that particular ingredient.

Check which fluid ounce the recipe means. One US fluid ounce is approximately 29.57 mL; one imperial fluid ounce is approximately 28.41 mL. The NIST conversion tables distinguish both from weight ounces.

US fluid ounces to milliliters, rounded to one decimal place
US fl ozApproximate mL
1/47.4
1/214.8
3/422.2
129.6
1 1/244.4
259.1

These are reference conversions, not a claim that an ordinary jigger can measure tenths of a milliliter. When a recipe gives rounded amounts in both systems, choose its stated primary units and follow that column throughout. If you deliberately adapt a recipe to convenient metric marks, record the new amounts. Calling 30 mL exactly one US fluid ounce hides a small change.

Choose a tool that fits the amount

A marked jigger is a practical choice for individual cocktails. Read its actual capacities and internal lines rather than assuming every double jigger measures the same amounts. For example, the UK OXO Steel Double Jigger lists 50, 20, and 10 mL on one side, and 30, 15, and 5 mL on the other. That is a specification example, not a hands-on product review.

A small liquid measuring cup can make several amounts easier to see. Look for clear markings near the quantities your recipes use. A large kitchen jug with widely spaced lines is awkward for a small syrup addition.

Measuring spoons are useful when their marked units match the recipe. Read the capacity on the spoon; an ordinary table spoon is not a measuring tool. Do not use a spoonful as a substitute for a specified number of drops or dashes.

A digital scale is useful for recipes written in grams and for making syrup by weight. Check that its resolution suits the smallest quantity you need. Tare the empty vessel, then weigh the ingredient. Keep grams in the record instead of relabeling them as milliliters.

A repeatable measuring routine

  1. Read the complete recipe first. Choose the unit system and check that your tool has the required marks. For 45 mL, separate 30 mL and 15 mL measures are an option when those marks are available. Do not estimate half the height of a tapered jigger and call it half the volume.
  2. Prepare the ingredients. Remove lime seeds and handle pulp the same way each time. Stir a separated syrup back together before measuring it. Use clean tools and a dry starting vessel so an unmeasured puddle of rinse water does not become an ingredient.
  3. Keep the measure level. Pour slowly as you approach the required line. For a conventional transparent side-marked measure, set it on a level surface and read at eye level. Where a clear liquid forms a concave meniscus, the little dip at its surface, read the bottom of that curve. NIST’s meniscus guidance explains why viewing position matters.
  4. Follow the tool’s reading method. Some measures are designed differently: OXO’s mini angled measuring jug is read from above. With a metal jigger, use its specified fill line or capacity and keep your filling method consistent. Avoid an extra dome of liquid above a brim measure.
  5. Transfer each measured ingredient. Pour it into the mixing vessel before measuring the next. Let thick syrup drain consistently. If syrup remains in the measure, rinse it through with part of another liquid already allocated by the recipe, rather than adding an unmeasured splash of water. If you overfill before mixing, remeasure that ingredient instead of guessing at a correction.
  6. Add ice and complete the recipe. Measuring into an empty shaker lets you finish the liquid amounts before shaking begins. Then follow the recipe’s ice and preparation instructions. Note any extra juice or sweetener you add afterward.

If the tool feels unfamiliar, practice the fill-and-pour sequence with water before making a drink. This is handling practice; it does not establish that the tool’s markings are accurately calibrated.

Record the ingredient, not just the number

“10 mL syrup” leaves an important question unanswered: which syrup? Equal volumes of different syrup recipes or commercial products need not contain equal amounts of sugar.

Record the product or the sugar-to-water ratio and whether that ratio is by weight or volume. For a 1:1 syrup by weight, for example, the starting ingredients could be 100 g sugar and 100 g water. That does not mean the finished syrup measures 200 mL.

The same habit helps with tequila and orange liqueur: write down the bottle and expression. For citrus, note whether the juice was fresh, bottled, strained, or used with pulp. Keeping the quantities steady cannot make different ingredients identical.

Scale the whole recipe

A ratio describes proportions; it does not choose a serving size. In a 2:1:1 volume ratio, setting one part to 20 mL gives 40 mL, 20 mL, and 20 mL. Setting one part to 30 mL gives 60 mL, 30 mL, and 30 mL. Neither calculation establishes a universally ideal flavor.

For multiple servings, multiply every measured ingredient, including any syrup or deliberately added water. Treat ice and preparation separately: multiplying the liquid amounts does not establish how much water the ice will add, or whether the batch will fit your shaker. Splitting a batch into recipe-sized portions for shaking is a straightforward way to keep the preparation manageable.

Keep a small note for the next round

Use a simple record: recipe, bottles, juice preparation, syrup recipe, amounts and units, measuring tool, ice and shaking method, and any adjustment. Change one ingredient amount at a time when exploring your preference, while keeping the rest as steady as practical.

Try the routine with our Cadillac margarita recipe, and save the amounts you actually used. Good measurement gives you a clearer starting point for the next margarita and a better way to remember the version you enjoyed.

Tips and Secrets of the Salted Rim for Your Margarita

0
Tips and Secrets of the Salted Rim for Your Margarita
A perfectly salted Margarita glass with coarse sea salt, surrounded by limes and various salts on a rustic wooden table, set against a serene lake scene.

¡Hola, Margarita aficionados! Today, we embark on a journey that will transform your Margarita experience into an irresistible fiesta of flavors. Join us as we delve into the delightful world of salt-rimmed glasses, the final touch that adds a captivating twist to your Margarita journey. Whether you prefer the boldness of a full rim or the subtlety of a partial rim, we’ll explore the good and the bad of each, guiding you through the art of salt selection and how it can make or break your Margarita moment. From classic sea salt to flavorful twists, let’s dive in and uncover the secrets of the perfect salted rim.

The Allure of the Salted Rim

Imagine raising a beautifully garnished Margarita to your lips, feeling the excitement build as the glass touches them. The first sip is an explosion of flavors—tequila’s smoothness, the zing of citrus, and the intriguing touch of salt. Ah, the salted rim—the magical gateway to Margarita ecstasy.

The Full Rim Fiesta

For some Margarita enthusiasts, a full rim is the unequivocal way to enjoy the classic cocktail. With each sip, your taste buds are treated to a harmonious blend of tequila, citrus, and the savory sensation of salt. A full rim adds a boldness that complements the Margarita’s vibrant flavors, creating an enchanting balance that leaves you craving for more.

The Good:

Sensory Delight: The combination of sweet, sour, and salty stimulates all your senses, enhancing your Margarita enjoyment.
Aesthetic Appeal: A fully coated rim presents a visually appealing presentation, setting the stage for a Margarita spectacle.
Sips and Snacks: With a full rim, every sip is accompanied by a hint of salt, turning your drink into a delightful treat.

The Bad:

Overwhelming: For some, a full rim can overpower the drink’s other flavors, disrupting the Margarita’s delicate balance.
Salt Overload: The intensity of a fully coated rim might not suit those who prefer a more subdued salt experience.

The Partial Rim Elegance

On the other end of the spectrum lies the partial rim—a sophisticated choice for those who seek a more subtle salt infusion. With only a fraction of the rim adorned with salt, the Margarita retains its grace while still offering the pleasing contrast of flavors.

The Good:

Balanced Flavors: The partial rim delicately complements the Margarita’s taste profile without overpowering it.
Customizable: The degree of saltiness can be adjusted to suit individual preferences.
Refined Presentation: A partial rim exudes elegance, offering a sophisticated look to your Margarita presentation.

The Bad:

Less Impactful: For some, the subtle presence of salt might not provide the same sensory excitement as a full rim.

The Quest for the Perfect Salt

Salt is not just salt; it’s a versatile ingredient that can make or break your Margarita experience. Let’s explore some of the most popular salts used for rimming Margarita glasses:

Sea Salt:
A classic choice for salt-rimmed Margaritas, sea salt boasts a coarse texture that adds a pleasant crunch to every sip. Derived from evaporated sea water, this versatile salt complements Margaritas of all kinds, lending a touch of oceanic essence to the cocktail.

Kosher Salt:
Kosher salt’s light and flaky texture make it a favorite among mixologists for salt-rimming glasses. Its mild flavor doesn’t overpower the drink, allowing the Margarita’s main ingredients to shine while still providing a delightful salted accent.

Beware the Table Salt:
While some bars might opt for table salt due to its affordability, the fine texture and intense taste of table salt can detract from the Margarita’s flavors. It’s best to steer clear of table salt to ensure a superior Margarita experience.

Flavorful Twists

Now that you’ve mastered the classic salted rim, why not take it to the next level with some creative twists? Here are a few delightful additions to enhance your Margarita adventure:

Citrus Zest:
For those craving an extra burst of citrus goodness, consider incorporating citrus zest into your salted rim. Lemon, lime, or orange zest beautifully infuse the salt, amplifying the Margarita’s natural flavors.

Spiced Delight:
Spice enthusiasts can elevate their Margarita experience with spiced salts. Experiment with chili, chipotle, or even smoked paprika-infused salts for a thrilling flavor adventure.

Sweet and Savory:
Merge the best of both worlds by adding a pinch of sweetness to your salted rim. A touch of honey or agave syrup mixed with salt creates a tantalizing balance of sweet and savory.

The Art of Salt-Rimming

Crafting the perfect salted rim is an art that elevates your Margarita presentation. Follow these simple steps to achieve Margarita mastery:

Prep Your Glass: Before pouring your Margarita, ensure your glass is clean and dry.

Moisten the Rim: Take a lime or citrus wedge and run it along the outer edge of the glass to moisten the rim. This will help the salt adhere. And, no, neither water nor margarita is better than the lime at getting the salt to stick. I have even found that dipping the rim in lime juice is not as good as rubbing the wet lime on the rim.

Dip in Salt: Pour a layer of salt onto a flat plate. Invert your glass and gently press the moistened rim into the salt, twisting the glass slightly to coat the rim evenly.

Shake Off Excess: Carefully lift the glass and tap it lightly to shake off any excess salt.

Craft Your Margarita: Now that your glass is perfectly salted, it’s time to craft your Margarita masterpiece!

Personalize Your Salted Rim

The beauty of the salted rim lies in its versatility. Feel free to get creative and add your own unique touch:

Salt Blends: Experiment with different salt blends, combining various salts and spices to create your custom rimming mix.

Dyed Salt: For themed occasions or special celebrations, consider using dyed salt to add a pop of color to your Margarita presentation.

Rim Variation: With the partial rim, you can create elegant half-moon patterns or rim only a section of the glass for a contemporary look.

In Conclusion

The salted rim is an art that allows you to tailor your Margarita experience to suit your unique taste preferences. Whether you opt for the bold allure of a full rim or the sophisticated elegance of a partial rim, the choice is yours to make. Experiment with various salts, unleash your mixology creativity, and let the salted rim add a pinch of magic to your Margarita journey.

¡Salud!